| 11.4. Cubism | ||
|---|---|---|

|
11. Artistic Filters |  |
The Cubism plug-in modifies the image so that it appears to be constructed of small squares of semitransparent tissue paper.
![[Tip]](images/tip.png)
|
Tip |
|---|---|
|
If setting possibilities of this filter are not enough for you, see GIMPressionist filter which offers more options. |
![[Note]](images/note.png)
|
Note |
|---|---|
|
These options are described in Section 2, “Common Features”. |
This variable determines the size, in pixels, of the squares to be used. This is, in effect, the size of the little squares of tissue paper used in generating the new image. The slider can be used, the exact pixel size can be entered into the text box, or the arrow buttons can be used.
This variable specifies how intense the color of the squares should be. This affects the opacity of the squares. A high value will render the squares very intensely and does not allow lower squares to show through. A lower value allows the lower squares to be more visible through the higher ones and causes more blending in the colors. If this is set to 0 and Use Background Color is not checked, the entire layer will be rendered black. If it is checked and the value here is zero, the background color will fill the entire layer.
This filter creates its tiles from all the colors of the image and paint them with a color scale which depends on the Tile Saturation. With a low Tile Saturation, this color scale lets the background color appear: default is black as you can see by setting Tile Saturation to 0. When this option is checked, the background color of the Toolbox is used. If your image has an Alpha channel, this color scale will also be transparent.
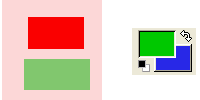
Figure 17.196. Example illustrating the action of the “Use BackGround color” option

The original image and the color area of Toolbox. BG color is blue.
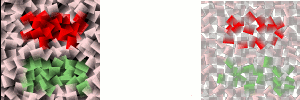
Figure 17.197. The option is not checked

The option is not checked. On the left is no Alpha: background is black. On the right is Alpha: background is transparent black.
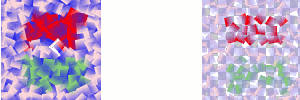
Figure 17.198. The option is checked

The option is checked. On the left, no Alpha: background is blue. On the right, with an Alpha channel, background is transparent blue.
The result of this filter can be larger than the original image. With the default Adjust option, the layer will be automatically resized as necessary when the filter is applied. With the Clip option the result will be clipped to the layer boundary.
![[Tip]](images/tip.png)
|
Tip |
|---|---|
|
If you are using this to generate background images for web pages and the like, work with a small range of colors painted randomly on a small square. Then apply the Cubism filter with the desired settings. As a last step, try Tile Seamless to adjust the image so it will tile seamlessly in your background. |