| 4.4. Templates Dialog | ||
|---|---|---|

|
4. Image Management Related Dialogs |  |
| 4.4. Templates Dialog | ||
|---|---|---|
|
|
4. Image Management Related Dialogs | |
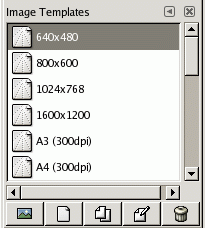
Templates are templates for an image format to be created. GIMP offers you a lot of templates and you can create your owns. When you create a New image, you can access to the list of existing templates but you can't manage them. The “Templates” dialog allows you to manage all these templates.
The “Templates” dialog is a dockable dialog; see the section Section 2.3, “Dialogs and Docking” for help on manipulating it.
You can access it:
from the image menu: → → .
from the Tab menu in any dockable dialog by clicking on
 and selecting
→ .
and selecting
→ .
You select a template by clicking on its icon. Right clicking reveals a local menu that offers the same functions as buttons.
In the Tab menu for the “Templates” dialog, you can choose between and . In Grid mode, templates are laid out in a rectangular array of identical icons (unless you gave them a particular icon, as we will see later). Only the name of the selected template is displayed. In List mode, they are lined up vertically; icons are identical too; all names are displayed.
In this Tab menu, the Preview Size option allows you to change the size of thumbnails.
![[Tip]](images/tip.png)
|
Tip |
|---|---|
|
Ctrl+F in a list view opens a search field. See View as List; View as Grid |
The buttons at the bottom of the dialog allow you to operate on templates in several ways:
 Create a new image from the selected template
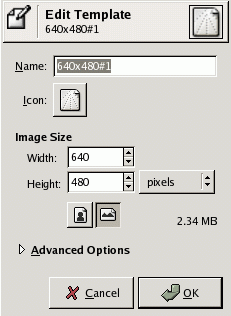
Clicking on this button opens the dialog Create a new image on the model of the selected template.
Clicking on this button opens the New template dialog, identical to the Edit Template dialog, that we will see below.
 Duplicate the selected template
Clicking on this button opens the Edit Template dialog that we are going to study now.
 Edit the selected template
Clicking on this button opens the Edit Template dialog.
Guess what?
|
|
Tip |
|---|---|
|
Every template is stored in a |
The dialog allows you to set the specifications of the selected template.
You can access this editor by clicking on the button at the bottom of the dialog.
Options
In this text box, you can modify the displayed template name.
By clicking on this icon, you open a list of icons. You can choose one of them to illustrate the selected template name.
Here you set the width and height of the new image. The default units are pixels, but you can switch to some other unit if you prefer, using the adjoining menu. If you do, note that the resulting pixel size will be determined by the X and Y resolution (which you can change in the Advanced Options), and by the setting of “Dot for Dot”, which you can change in the menu.
![[Note]](images/note.png)
|
Note |
|---|---|
|
Please keep in mind, that every Pixel of an image is stored in the memory. If you're creating large files with a high density of pixels, GIMP will need some time for every function you're applying to the image. |
These buttons toggle between Portrait and Landscape mode. Concretely, their effect is to exchange the values for Width and Height. If the X and Y resolutions are different (in Advanced Options), then these values are exchanged also. On the right, image size, image resolution and color space are displayed.
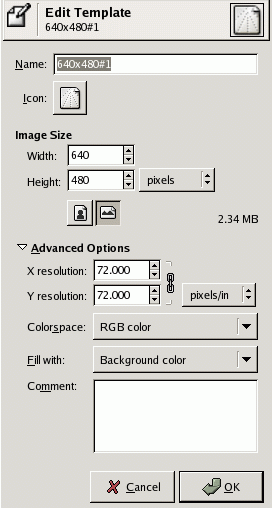
Advanced Options
These are options that will mainly be of interest to more advanced users.
These values come into play mainly in relation to printing: they do not affect the size of the image in pixels, but they determine its size on paper when printed. They can also affect the way the image is displayed on the monitor: if “Dot for Dot” is switched off in the menu, then at 100% zoom, GIMP attempts to display the image on the monitor at the correct physical size, as calculated from the pixel dimensions and the resolution. The display may not be accurate, however, unless the monitor has been calibrated. This can be done either when GIMP is installed, or from the Display tab of the Preferences dialog.
You can create the new image as either an RGB image or a grayscale image. You cannot create an indexed image directly in this way, but of course nothing prevents you from converting the image to indexed mode after it has been created.
You have four choices for the solid color that will fill the new image's background layer:
Foreground color, as shown in the Main Toolbox.
Background color, as shown in the Main Toolbox.
White, the more often used.
Transparent. If this option is chosen, then the Background layer in the new image will be created with an alpha channel; otherwise not.
You can write a descriptive comment here. The text will be attached to the image as a “parasite”, and will be saved along with the image by some file formats (but not all of them).